Building Reaktors and Aktors: A Comprehensive Guide
This guide provides a comprehensive overview of how to build reaktors and aktors in the Operaide system. It covers how to get started with existing templates, the different ways to create aktors, when to use each approach, and how to compose aktors into reaktors.
Getting Started with Reaktors
Starting from a Template
The easiest way to get started is by using one of the available templates and apps. They already contain the necessary scaffold to start your development.
-
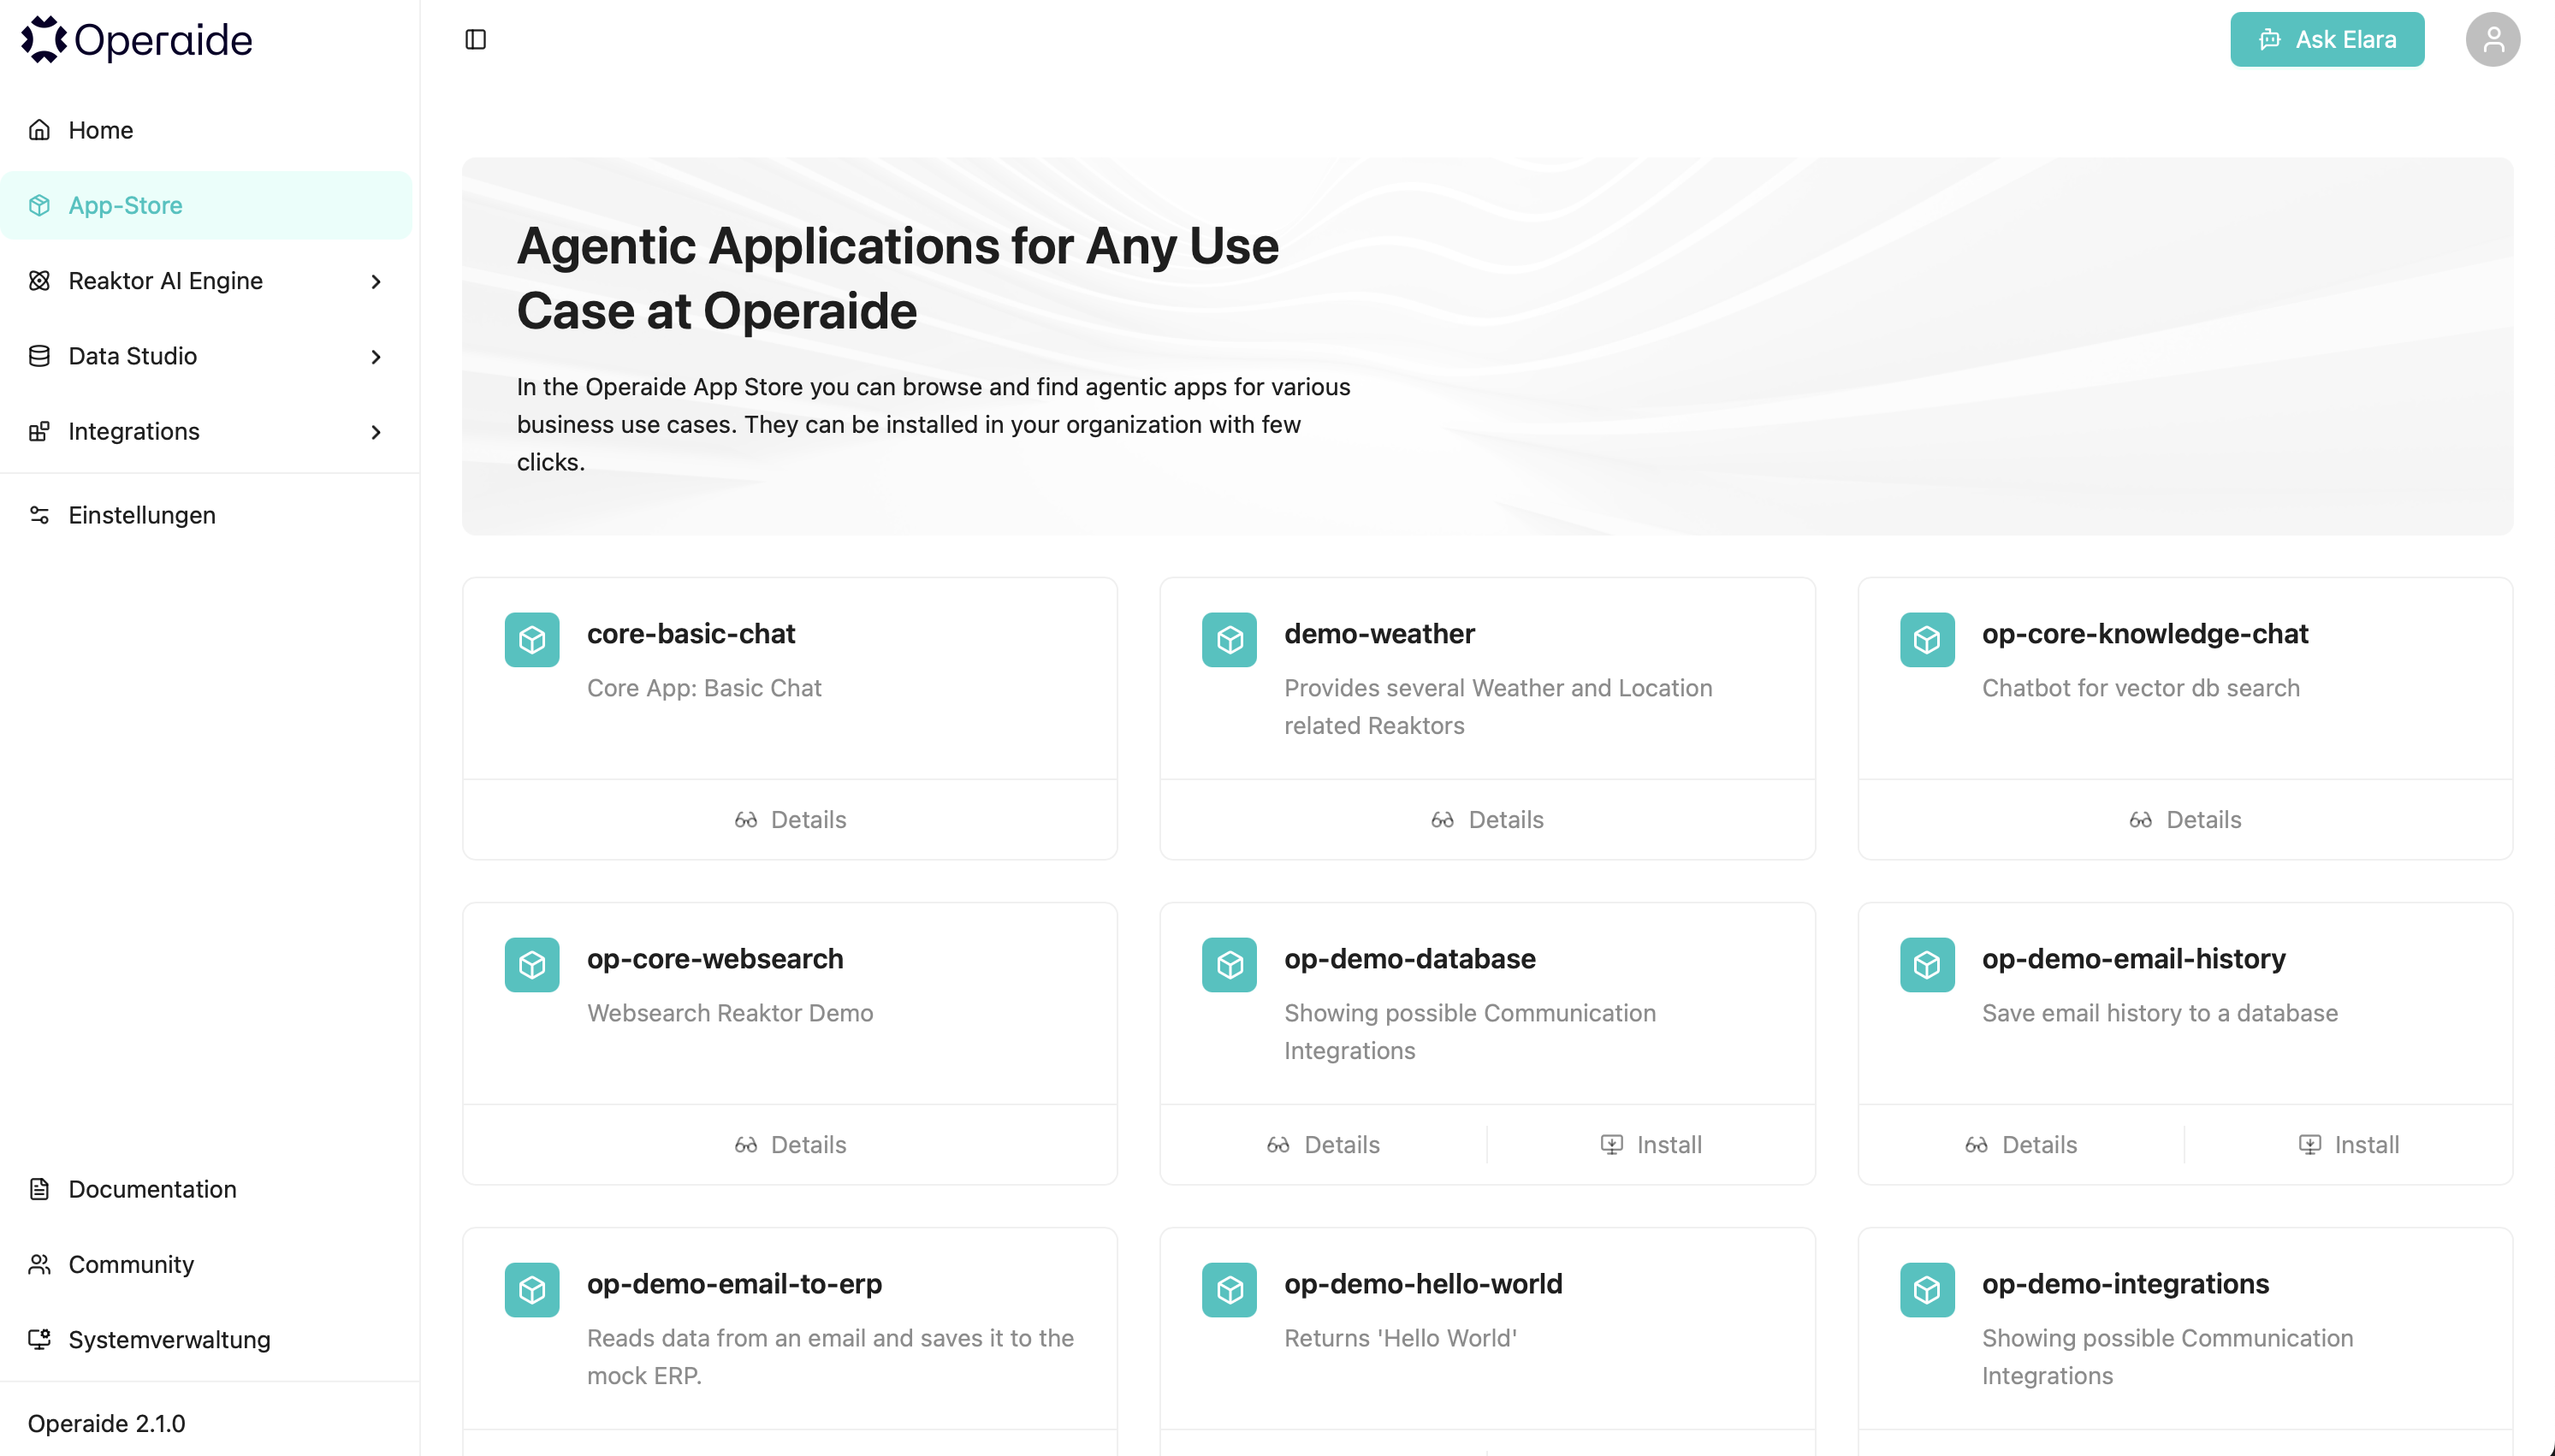
Head to the App Store inside the Operaide Platform and select one of the available apps that most closely matches the type of reaktor you want to build.
-
Click on the Install Button to download and install the application in Operaide.
-
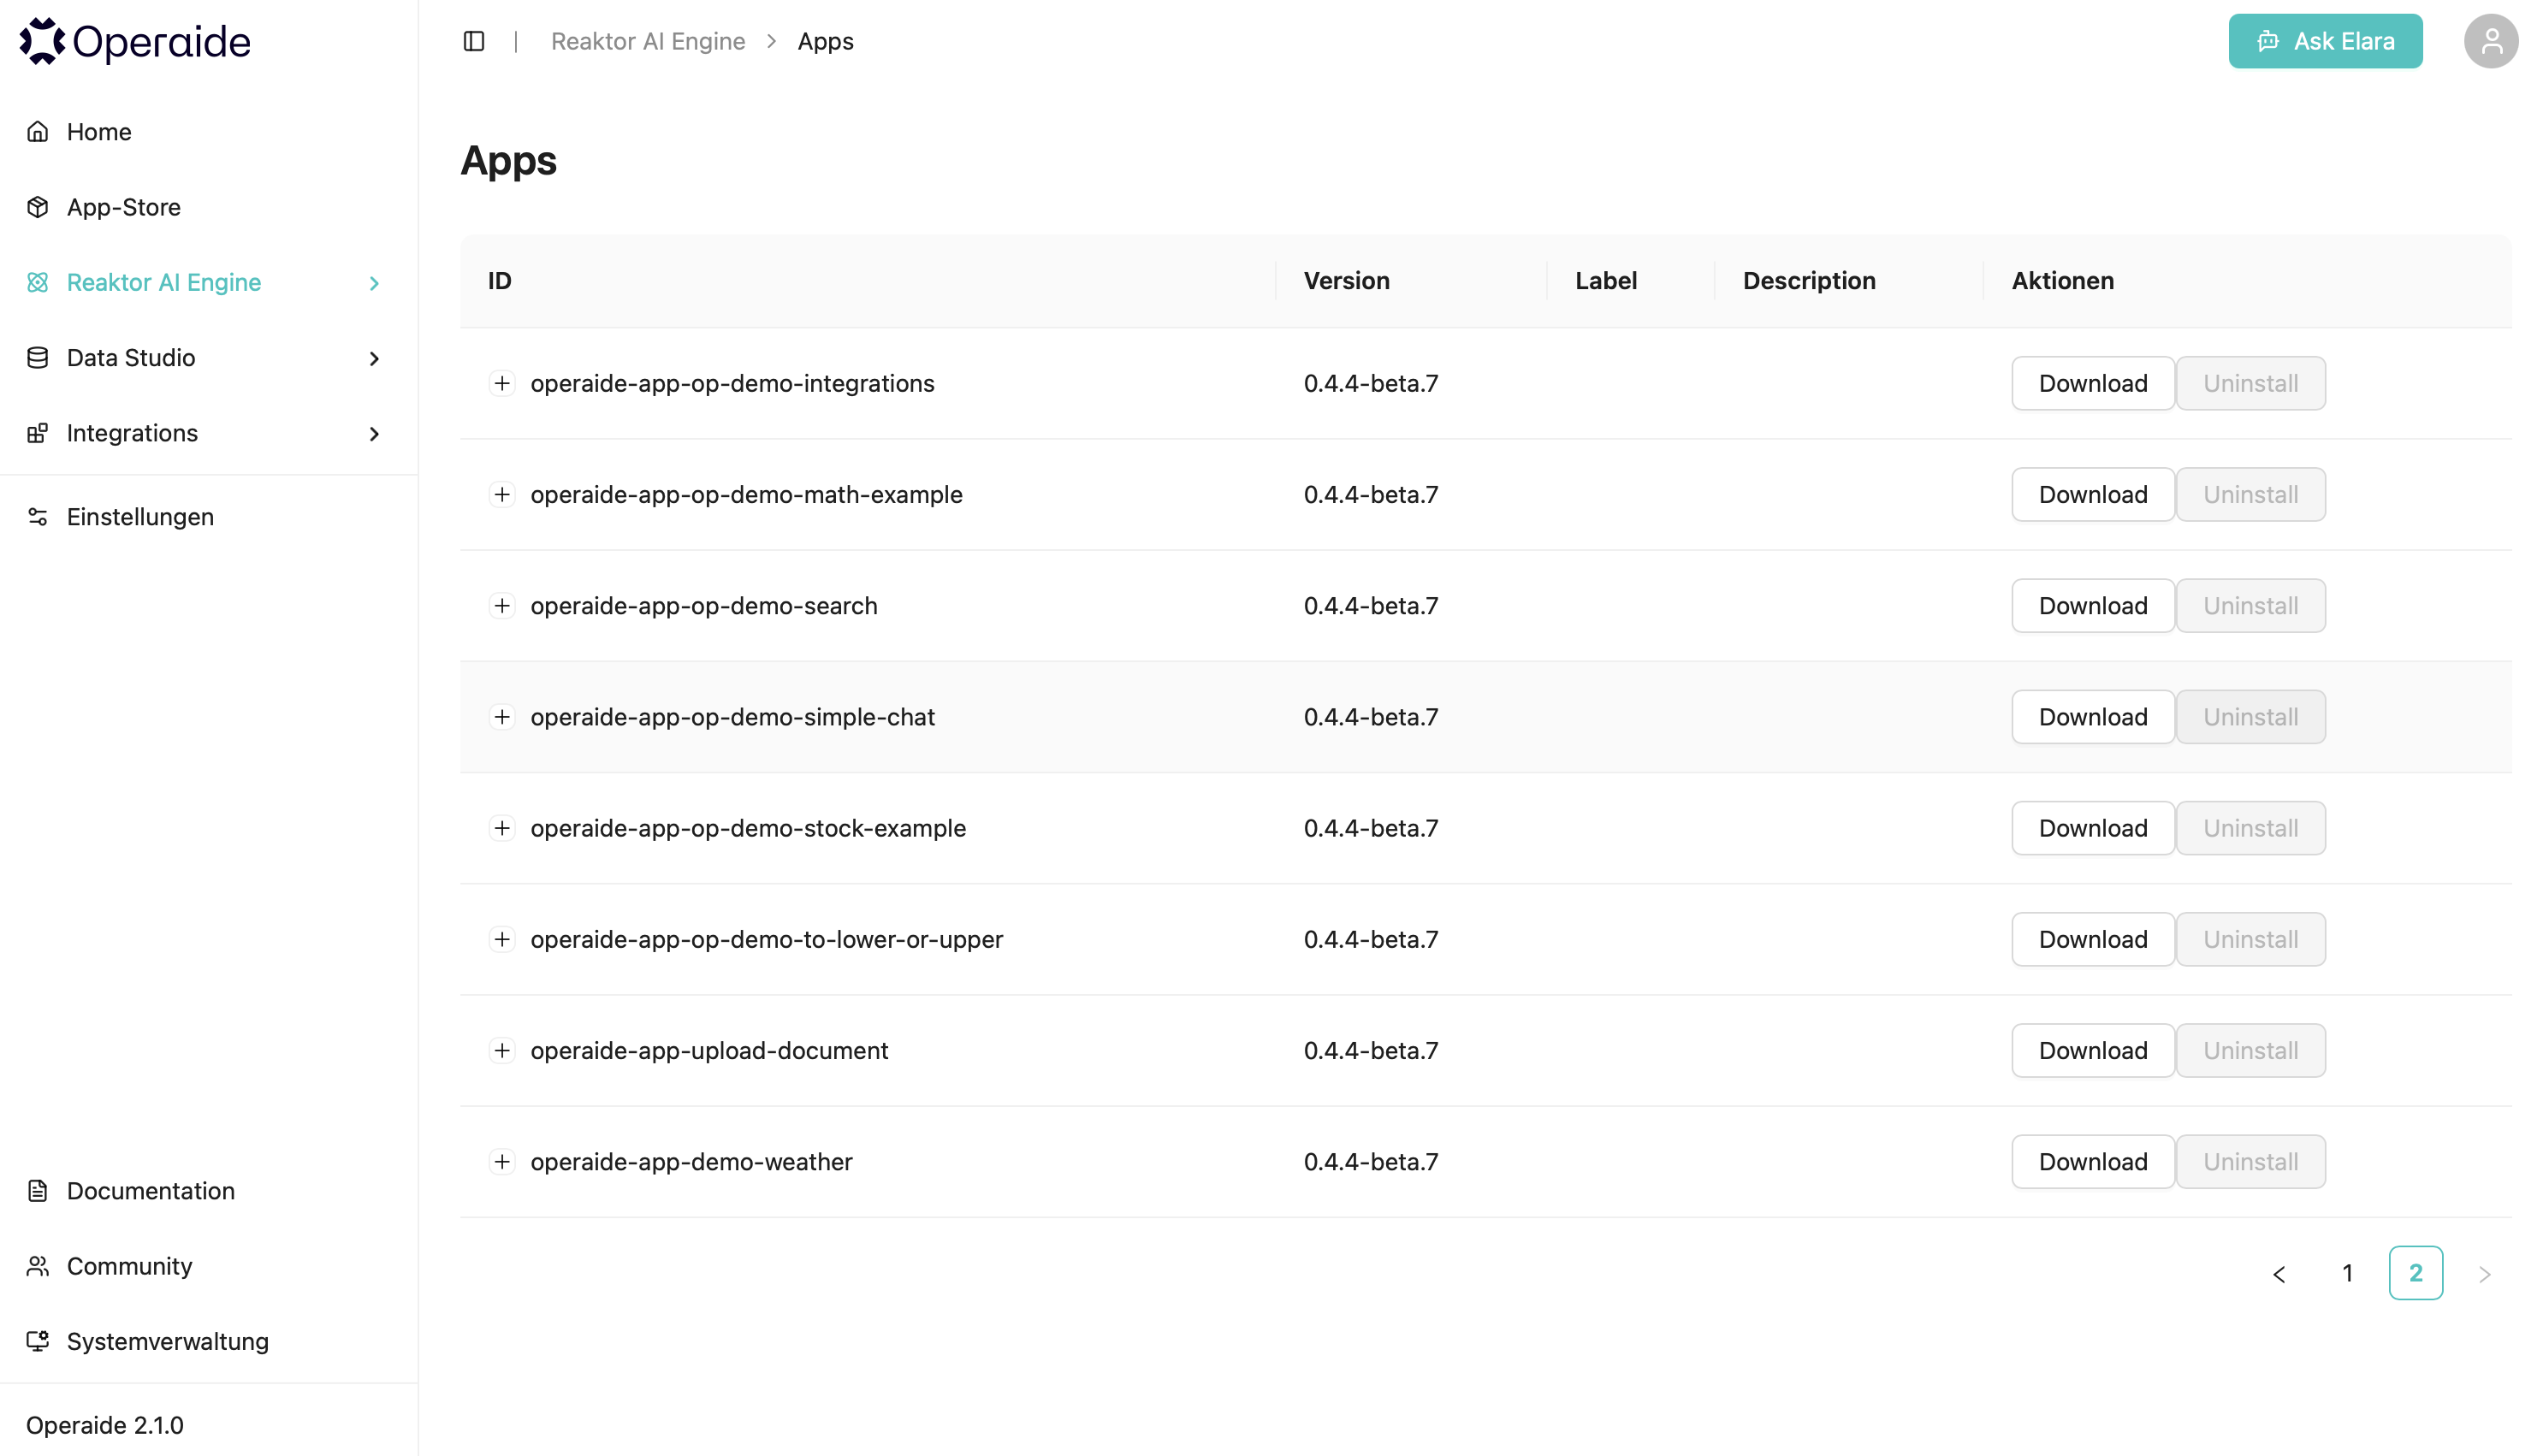
Once done, head to the Reaktor AI Engine -> Apps, where you should see your newly installed app.
-
From here, you have the option to download the whole app to make any adjustments or use it as a starter for your own development.
-
When you press the download button, we create a preconfigured bundle, which contains config to deploy it back into the system where you downloaded it from.
-
Open this bundle in your favorite IDE, read the included README.md files and get started with your development. Don't forget to change the app name in the package.json, so your app shows up with an appropriate name.
To see how you can deploy this custom Reaktor, see our Reaktor Deployment Gudie.
Introduction to Aktors and Reaktors
What is an Aktor?
An Aktor is a fundamental building block in the Operaide system. It represents a computation that can be composed with other aktors to form complex workflows. Aktors have the following key characteristics:
- Lazy Evaluation: Aktors compute their values only when needed.
- Caching: Once computed, an aktor's value is cached and reused.
- Composability: Aktors can be composed together to form complex computations.
- Type Safety: Aktors are strongly typed using TypeScript.
- Streaming Support: Some aktors can produce streams of values over time.
At its core, an Aktor is an object that implements the Aktor<TValue, TStream> interface, which provides two main methods:
interface Aktor<TValue = unknown, TStream = unknown> {
    get(): Promise<TValue>;
    getStream(): AsyncIterable<TStream>;
}
get(): Returns a promise that resolves to the final, aggregated value.getStream(): Returns an async iterator that yields incremental stream elements.
What is a Reaktor?
A Reaktor is a registered, deployable composition of Aktors that can be executed as a unit. Reaktors are the entry points for workflows in the Operaide system. They have the following characteristics:
- Registration: Reaktors are registered with the system using
registerReaktorDefinition. - Input/Output Schema: Reaktors define their input and output schemas using Zod.
- Metadata: Reaktors include metadata like label, description, and summary.
- Composition: Reaktors are composed of a tree of Aktors.
- Deployment: Reaktors can be deployed and executed through the Operaide platform.
A Reaktor is essentially a factory that creates an Aktor tree based on input parameters. The createReaktor method in a Reaktor definition takes an AktorMap of input parameters and returns an Aktor that represents the entire computation.
Creating Aktors
There are multiple ways to create aktors in the Operaide system, each with its own use cases and advantages. Let's explore each approach.
1. Using defineAktor
The defineAktor function is the most low-level and flexible way to create an aktor. It gives you full control over the aktor's behavior, including how it computes its value and how it handles streaming.
import type { Aktor } from '@operaide/aktor';
import { defineAktor } from '@operaide/aktor';

function aktorExample(input: {
    // Input parameters as Aktors
    param1: Aktor<string>;
    param2: Aktor<number>;
}) {
    return defineAktor(
        'aktorExample', // Name of the aktor (must start with 'aktor')
        {
            // Options for the aktor
            async getValue(params) {
                // Logic to compute the value
                const param1Value = await params.param1.get();
                const param2Value = await params.param2.get();
                return `${param1Value}: ${param2Value}`;
            },
            async *getValueStream(params) {
                // Logic to produce a stream of values
                const param1Value = await params.param1.get();
                const param2Value = await params.param2.get();
                yield `${param1Value}: ${param2Value} (part 1)`;
                yield `${param1Value}: ${param2Value} (part 2)`;
            },
        },
        input // Input parameters
    );
}
Use defineAktor when:
- You need full control over how the aktor computes its value
- You need to implement custom streaming behavior
- You're creating a complex aktor that can't be easily expressed as a pure function
- You need to compose multiple aktors in a custom way
2. Using createAktorFunction
The createAktorFunction is a helper method that makes it easy to create aktors from pure functions. It's simply a wrapper to quickly define aktors without having to write all the boilerplate code. It handles resolving the aktor inputs to plain values before passing them to the pure function.
import { aktorConst, createAktorFunction } from '@operaide/aktor';

// Define a pure function
function sum({ x, y }: { x: number; y: number }): number {
    return x + y;
}

// Create an aktor factory for the function
const aktorSum = createAktorFunction('aktorSum', sum);

// Use the factory to create an aktor
const sumAktor = aktorSum({
    x: aktorConst(10),
    y: aktorConst(20),
});
Use createAktorFunction when:
- You have a pure, synchronous function that you want to use with aktors
- Your function takes plain values (not aktors) as input
- You don't need custom streaming behavior
- You want a quick, concise way to define an aktor without writing boilerplate
3. Using createAktorFunctionAsync
The createAktorFunctionAsync is similar to createAktorFunction, but it's designed for asynchronous functions that return promises. It's also a helper method that serves as a wrapper to quickly define aktors for async functions.
import { aktorConst, createAktorFunctionAsync } from '@operaide/aktor';

// Define an async function
async function fetchData({ url }: { url: string }): Promise<any> {
    const response = await axios.get(url);
    return response.data;
}

// Create an aktor factory for the async function
const aktorFetchData = createAktorFunctionAsync('aktorFetchData', fetchData);

// Use the factory to create an aktor
const dataAktor = aktorFetchData({
    url: aktorConst('https://api.example.com/data'),
});
Use createAktorFunctionAsync when:
- You have an asynchronous function that returns a promise
- Your function takes plain values (not aktors) as input
- You don't need custom streaming behavior
- You want a quick, concise way to define an aktor without writing boilerplate
4. Using createAktorMap
The createAktorMap function is a utility for converting a plain object into an object where each value is an aktor.
import { createAktorMap, aktorConst } from '@operaide/aktor';

// Create a plain object
const obj = {
    name: 'John',
    age: 30,
};

// Convert it to an AktorMap
const aktorMap = createAktorMap(obj, aktorConst);
Use createAktorMap when:
- You have a plain object that you want to convert to an object of aktors
- You want to apply the same aktor factory to each value in the object
Decision Tree for Creating Aktors
When deciding which approach to use for creating aktors, consider the following decision tree:
-
Do you need to convert a plain object to an object of aktors?
- Yes: Use
createAktorMap - No: Continue to step 2
- Yes: Use
-
Are you working with a function that takes plain values as input?
- Yes: Continue to step 3
- No: Use
defineAktor
-
Is your function asynchronous (returns a Promise)?
- Yes: Use
createAktorFunctionAsync - No: Use
createAktorFunction
- Yes: Use
-
Do you need custom streaming behavior?
- Yes: Use
defineAktor - No: Continue with your choice from step 3
- Yes: Use
-
Do you need complex composition of multiple aktors?
- Yes: Use
defineAktor - No: Continue with your choice from step 3 or 4
- Yes: Use
Creating Reaktors
A Reaktor is a registered, deployable composition of Aktors. Here's how to create a Reaktor:
- Create a new TypeScript file with a
.reaktor.tsextension (this is conventional but not required). - Import the necessary dependencies:
import { z } from 'zod';
import { registerReaktorDefinition } from '@operaide/aktor';
- Define your Reaktor using
registerReaktorDefinition:
registerReaktorDefinition({
    // Metadata
    reaktorDefinitionId: 'my-unique-reaktor-id',
    label: 'My Reaktor',
    description: 'A description of what my reaktor does',
    summary: 'Optional summary',

    // Input schema
    inputSchema: z.object({
        param1: z.string().openapi({ example: 'example value' }),
        param2: z.number().openapi({ example: 42 }),
    }),

    // (Optional) Streaming schema
    streamSchema: z.any(),

    // Output schema
    outputSchema: z.object({
        result: z.string(),
    }),

    // Create the reaktor
    createReaktor(params) {
        // Compose aktors to form the reaktor
        return aktorExample({
            param1: params.param1,
            param2: params.param2,
        });
    },
});
The createReaktor method is where you compose aktors to form the reaktor. It takes an AktorMap of input parameters and returns an Aktor that represents the entire computation.
UI Schema Tags
When defining input schemas for Reaktors, you can use special tags in the .openapi() description to customize how fields are rendered in the UI. These tags are processed by the schema transformation system to provide enhanced UI components.
Available UI Tags
File Upload Tag: [file-upload]
The [file-upload] tag transforms a string field into a file upload component in the UI. This is particularly useful for Reaktors that need to process files like images, documents, or audio files.
inputSchema: z.object({
    document: z.string().openapi({
        description: '[file-upload] Upload a PDF document for analysis',
        example: 'data:application/pdf;base64,JVBERi0xLjQKJcfs...'
    }),
    image: z.string().openapi({
        description: '[file-upload] Upload an image (PNG, JPEG, etc.)',
        example: 'data:image/png;base64,iVBORw0KGgoAAAANS...'
    }),
})
When the [file-upload] tag is detected:
- The UI renders a file upload component instead of a text input
- Files are automatically converted to base64 data URLs
- The resulting string value follows the format:
data:[mime-type];base64,[base64-encoded-content]
Textarea Tag: [textarea]
The [textarea] tag transforms a string field into a multi-line text area in the UI. This is useful for fields that expect longer text content like prompts, descriptions, or document content.
inputSchema: z.object({
    prompt: z.string().openapi({
        description: '[textarea] Enter your detailed prompt here',
        example: 'Analyze the following document and provide a summary...'
    }),
    notes: z.string().openapi({
        description: '[textarea] Additional notes or context',
        example: 'These are some notes that might span multiple lines...'
    }),
})
When the [textarea] tag is detected:
- The UI renders a multi-line textarea instead of a single-line input
- Users can enter text with line breaks and formatting
- The textarea automatically expands to accommodate content
Best Practices for UI Tags
- Place tags at the beginning: Always place UI tags at the start of the description, followed by a space
- Combine with descriptive text: Include helpful description after the tag to guide users
- Use appropriate examples: Provide realistic examples that match the expected format
- Consider the data format: Remember that file uploads result in base64 data URLs
Example of a complete Reaktor using UI tags:
registerReaktorDefinition({
    reaktorDefinitionId: 'document-analyzer',
    label: 'Document Analyzer',
    description: 'Analyzes uploaded documents with custom instructions',
    inputSchema: z.object({
        document: z.string().openapi({
            description: '[file-upload] Upload a document (PDF, DOCX, TXT)',
            example: 'data:application/pdf;base64,JVBERi0xLjQK...'
        }),
        instructions: z.string().openapi({
            description: '[textarea] Provide analysis instructions',
            example: 'Please analyze this document for:\n- Key themes\n- Summary points\n- Action items'
        }),
        outputFormat: z.enum(['summary', 'detailed', 'bullet-points']).openapi({
            description: 'Choose the output format',
            example: 'summary'
        })
    }),
    outputSchema: z.object({
        analysis: z.string(),
        confidence: z.number()
    }),
    createReaktor(params) {
        // Implementation here
    }
});
The Concept Behind Reaktors
Reaktors are designed around the concept of an Abstract Syntax Tree (AST) of computations. Each node in the tree is an Aktor, and the tree as a whole represents a complex computation.
The key advantages of this design are:
- Lazy Evaluation: Computations are only performed when their results are needed.
- Caching: Results are cached and reused, avoiding redundant computations.
- Parallelism: Independent branches of the tree can be computed in parallel.
- Instrumentalization: The computation tree can be inspected, logged, and monitored.
- Serialization: The tree can be serialized and deserialized, allowing computations to be distributed across machines.
When a Reaktor is executed, the system:
- Creates an Aktor tree based on the input parameters.
- Traverses the tree to compute the final result.
- Caches intermediate results to avoid redundant computations.
- Returns the final result according to the output schema.
This design allows for complex, efficient, and maintainable workflows.
Examples
Example 1: Simple Reaktor with a Single Aktor
import { z } from 'zod';
import { createAktorFunction, registerReaktorDefinition } from '@operaide/aktor';

// Define a pure function
function multiply({ a, b }: { a: number; b: number }): number {
    return a * b;
}

// Create an aktor factory
const aktorMultiply = createAktorFunction('aktorMultiply', multiply);

// Register the reaktor
registerReaktorDefinition({
    reaktorDefinitionId: 'simple-multiply-example',
    label: 'Multiply Reaktor',
    description: 'Multiplies two numbers',
    inputSchema: z.object({
        a: z.number().openapi({ example: 2 }),
        b: z.number().openapi({ example: 3 }),
    }),
    outputSchema: z.number(),
    createReaktor(params) {
        return aktorMultiply({
            a: params.a,
            b: params.b,
        });
    },
});
Example 2: Complex Reaktor with Multiple Aktors
import axios from 'axios';
import { z } from 'zod';
import type { Aktor } from '@operaide/aktor';
import { createAktorFunctionAsync, defineAktor, registerReaktorDefinition } from '@operaide/aktor';

// Async function to fetch weather data
async function getWeather({ city }: { city: string }): Promise<any> {
    const response = await axios.get(`https://api.example.com/weather?city=${encodeURIComponent(city)}`);
    return response.data;
}

// Create an aktor factory
const aktorGetWeather = createAktorFunctionAsync('aktorGetWeather', getWeather);

// Aktor to format the weather data
function aktorFormatWeather(input: { weather: Aktor<any> }) {
    return defineAktor(
        'aktorFormatWeather',
        {
            async getValue({ weather }) {
                const data = await weather.get();
                return {
                    city: data.city,
                    temperature: data.temperature,
                    conditions: data.conditions,
                };
            },
        },
        input
    );
}

// Register the reaktor
registerReaktorDefinition({
    reaktorDefinitionId: 'weather-example',
    label: 'Weather Reaktor',
    description: 'Gets weather information for a city',
    inputSchema: z.object({
        city: z.string().openapi({ example: 'New York' }),
    }),
    outputSchema: z.object({
        city: z.string(),
        temperature: z.number(),
        conditions: z.string(),
    }),
    createReaktor(params) {
        // Get the weather data
        const weather = aktorGetWeather({
            city: params.city,
        });

        // Format the weather data
        return aktorFormatWeather({
            weather,
        });
    },
});
Visualizing Reaktor Structure
When creating a Reaktor for a more complex workflow, it's important to think about the structure of the Reaktor. We recommend making a simple sketch of your workflow as a tree structure. This will help you understand the dependencies between the Aktors and how to compose them.
Here's an example of a Reaktor structure visualization:
This diagram shows a typical Reaktor structure where:
- Blue nodes represent complex Aktors that may contain nested Aktors
- Pink nodes represent AktorFunctions that perform simple operations
Visualizing your Reaktor structure before implementation can help you:
- Identify reusable components
- Understand data flow
- Plan for error handling
- Optimize performance
Best Practices
-
Naming Conventions:
- Aktor names should start with
aktor(e.g.,aktorMultiply). - Reaktor files should have a
.reaktor.tsextension. - Use descriptive names that indicate what the aktor or reaktor does.
- Aktor names should start with
-
Composition:
- Break down complex computations into smaller, reusable aktors.
- Compose aktors to form more complex computations.
- Use the appropriate aktor creation method based on your needs.
-
Error Handling:
- Use the
retryOnErrorInMillisecondsandmaxRetriesoptions for aktors that might fail. - Handle errors gracefully and provide meaningful error messages.
- Use the
-
Performance:
- Leverage the caching behavior of aktors to avoid redundant computations.
- Use
aktorParallelfor independent computations that can be run in parallel.
-
Documentation:
- Provide clear descriptions and summaries for your reaktors.
- Document the input and output schemas with examples.
Deploying Reaktors
After you've built your Reaktor, you'll need to deploy it to make it available for use. Here's a brief overview of the deployment process:
-
Install Dependencies: If you're working with a downloaded Blueprint, make sure to install all dependencies:
npm install -
Deploy the Reaktor: Use the deploy command to deploy your Reaktor:
npm run deploy -
Watch for Changes: During development, you can use the watch command to automatically redeploy when changes are made:
npm run deploy-watch -
Access Your Reaktor: Once deployed, you can access your Reaktor through:
- The Operaide UI in the Reaktor AI Engine section
- The REST API using your API key
For more detailed information about deploying Reaktors, including working with Blueprints and the App Store, refer to the Reaktor Deployment documentation.
Conclusion
Aktors and Reaktors provide a powerful framework for building complex, efficient, and maintainable workflows. By understanding the different ways to create aktors and how to compose them into reaktors, you can leverage the full power of the Operaide system.
This guide has covered:
- Getting started with templates
- The fundamentals of Aktors and Reaktors
- Different ways to create Aktors
- A decision tree for choosing the right approach
- How to create Reaktors
- Visualizing Reaktor structure
- Examples and best practices
- Deploying Reaktors
For more information, refer to the API documentation and other guides in the Operaide documentation:
- Tips for Development - Additional tips for developing Reaktors
- Reaktor Deployment - Detailed information about deploying Reaktors